Monday, January 21, 2013

Chapter 5 Screen options

Chapter 5 Screen options

So, screen.
Basically we have a DDoS Distributed Denial of Service attack and hackers.
In order to protect the SRX from them. The first thing the SRX can do is defend itself by dropping
obvious blatant hostile packets.
They call this SCREENING.
Basically if the person is drunk, he can't get in the club. Flip flops same thing. Pretty much the obvious things.

So back to the diagram.
Notice how the first thing is SCREEN.
No sense in wasting resources on drunks and flip-floppers.


The options follow the.
set security  screen   (stanza)
set security screen    ids-option  IDS_protect


inside each you will have to state the protocol you are protecting and the protection.


ids-option IDS_protect {
    icmp {
        ip-sweep threshold 5000;             # this controls how many ip ping sweep
        fragment;                                            # a ping should not be fragmented as it is very small. 
        large;                                                    # a ping is tiny,tiny and should not be large.
        flood threshold 1000;                   # They try to ping flood your resources
        ping-death;                                        # This is an old oversized ping attack.


All of the above protected you from pings.


IP structure.
 ip {
        bad-option;                                                               #use the wrong option and it drops it.
        record-route-option;                                            # try recording the route and drops it.
        timestamp-option;                                                # try getting a timestamp response the drop
        security-option;                                                     # obsolete - used to be for DOD
        stream-option;                                                       # obsolete used to be for satellites. 
        spoofing;                               # when the IP is compared to the table and it should not come from there
        source-route-option;                # trying to dictate to me which route to take drop
        loose-source-route-option;             # these only DETECT and do not drop
        strict-source-route-option;              #these only DETECT and do not drop
        unknown-protocol;                             #unknown protocol field.
        block-frag;                                           #
        tear-drop;                                                # tear drop is an old attack trying to  badly assemble IP
    }


TCP attacks.

So SYN is to synchronize and you use it at the start.
FIN is to finalize the session and you use it at the end.
So you shouldn't have a
SYN-FIN    a syn and a fin in the same packet.  If you have then drop.
tcp {
        syn-fin;                       


        fin-no-ack;
If you want to close the session you send a FIN with an ack. Then you get a FIN with an ack.
So there is always an ack with the FIN.
So if you get a FIN with out an ack     .  then drop it.


        tcp-no-flag;
If you get no flag at all, no syn , no fin, no ack.    Then totally fishy simply drop it.

        syn-frag;
A syn packet should be very small, like ping. So if it says syn-frag.   There is no way it is being frag drop


        port-scan threshold 5000;
This is to protect you agains a port scan. More than X ports being scanned then drop it.

        syn-ack-ack-proxy threshold 512;
If your device is running proxy, this will protect you.

        syn-flood {
            alarm-threshold 100;                #number of TCP per second
            attack-threshold 700;                  #number of SYN to destination and port
            source-threshold 400;                   #number of SYN from source
            destination-threshold 300;            #number of SYN to destination 
            timeout 40;                                          #number of seconds before you drop half completed connections
        }

Ok, somebody is trying to exhaust your resources by running syn to open a connection.

        land;                          #  uses the same IP of the receiver to crash him.
        winnuke;                      # old attack on port 139


UDP attack.
Since UDP is connection-less there is only one attack.
Which is designed to drain your resources.
udp {        
     flood threshold 3000;
    }


The last protection is on the session table.
This is the table that we used earlier to leave the back and forth communication open.


limit-session   {
            source-ip-based       900
           destination-ip-based        128

#limit the number of one source IP opening sessions
#limit the number of open sessions to ONE destination IP.


At the end apply it to the zone.
set security zone WAN screen IDS_protect.


Sunday, January 20, 2013

Practice Lab 2 - Web Authentication

Practice Lab 2 - Web Authentication


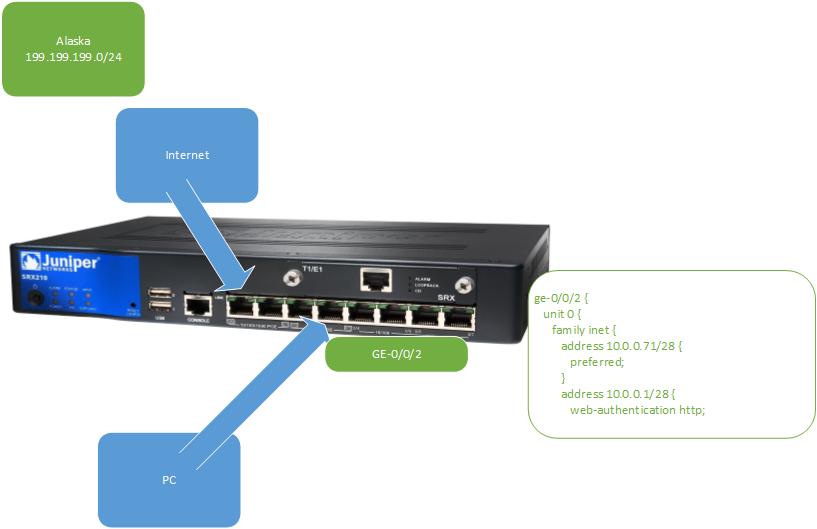
So the idea above is
PC 192.168.0.100 is blocked from getting out to the server.

In order to be able to get to the server.
1. PC 192.168.0.100 will open a web page to   the "web authentication" http  IP.  of 192.168.0.2
2. PC 192.168.0.100 will get a web page from the SRX . The web page looks like this.


3. The user types in his user and password.
Now the gate is open.
4. PC 192.168.0.100 can have access to the WAN interface and the server in the internet.


First.
Let's configure the LAN interface.
Set system services web-management http       # turns on web management
set interface fe-0/0/0 unit 0 family inet address 192.168.0.2/24 web-authentication http
this set up a secondary IP on the fe-0/0/0 interface  and set the type as web-authentication http

set interface fe-0/0/0 unit 0 family inet address 192.168.0.1/24 preferred 
this sets up the  main IP on the fe-0/0/0    Juniper calls it the "preferred" . This IP when you type it in the URL will allow you to manage the SRX using the portal.


Ok, so we have two entities configured on the interface.
preferred
web-authentication http

Now we can put the interface into a zone.
set security zone security-zone LAN interface fe-0/0/0 host-inbound-traffic system-services http
don't forget to add the host-inbound-traffic to the interface.

now we can set up a policy to allow LAN to go to WAN and invoke the "web-authentication" check.
set security policy from zone LAN to zone WAN policy allow_lan_wan_traffic_web_auth
now we can use the match.
match
           source-address 192.168.0.0/24
           destination-address  any

           application    any
then
       permit {
                   firewall-authentication {

                     web-authentication {
                         client-match admin;

so basically.
We match the traffic from the LAN  towards the WAN  I used any application.
The traffic will be permitted   into the firewall-authentication of the type  web-authentication

the last part is the client-match we used before.
which is the list of users that are allowed access.

root# show access
profile test-profile {
    client admin {
        firewall-user {
            password secret_password_:)


So the main things to carry away are.
The passthrough authentication works for
http, ftp, telnet
the Web Authentication works for everything you want. It is simply used to allow the policy permit
to work. I used application any.
So in my example, you can set up a policy that if you want to ping for example. Then you must first authenticate to the web-authentication portal.


Alright,
last one for the exam.
You can add "web-redirect". This basically intercepts web requests and sends them to the
web-authentication portal.


 permit {
                    firewall-authentication {
                        web-authentication {
                            client-match metacortex;
                            web-redirect;
simply add the command at the end.  web-redirect


Friday, January 18, 2013

Practice Lab 1 - pass through authentication

Practice Lab


Ok.
I am assuming you have a Juniper Firewall.
I bought the SRX100B as it was the cheapest.

Simply plug the LAN laptop to a port.
then plug the WAN laptop to a port
then plug the WAN Cisco router to a port.


The logical idea is simple.
The LAN PC at the bottom will open a HTTP/FTP session to the WAN PC.
At that point the session will be intercepted by the SRX which will present you
with his localdatabase user and password login.
After the LAN PC is authenticated it will remain authenticated for the firewall until 10 minutes elapse.


set interface fe-0/0/8 unit 0 family inet address 192.168.0.1/24
set interface fe-0/0/0 unit 0 family inet address 10.0.0.1/24
set interface fe-0/0/1 unit 0 family inet address 11.0.0.1/24

So now it should look like this


 the next step is creating the zones.
We will create two
LAN and INTERNET.
set security zone security-zone LAN interface fe-0/0/8 host-inbound-traffic system-services ping

so, that created a LAN security zone, it made interface fe-0/0/8 belong to it
and I enabled the interface to respond to ping so I can test it if I have issues.


set security zone security-zone INTERNET interface fe-0/0/0
set security zone security-zone INTERNET interface fe-0/0/1
same thing.
Create a security zone called INTERNET and added two interfaces to it.


Alright,
Now we need to set up a NAT.
The NAT will be a source NAT.
Traffic from LAN will be natted


set security nat source rule-set translate_lan from zone LAN 
set security nat source rule-set translate_lan from to zone INTERNET
set security nat source rule-set translate_lan rule ALL_to_10.0.0.1

so we created a NAT source rule-set
it goes from zone LAN to zone INTERNET
the first rule is.
set security nat source rule-set translate_lan rule ALL_to_10.0.0.1 match source-address 192.168.0.0/24


set security nat source rule-set translate_lan rule ALL_to_10.0.0.1 then source-nat pool ip_1

so we told it to look for the source address IP of our LAN
and if it matches give the outgoing packet the NAT ip from pool ip_1

now we can create that pool
set security nat source pool ip_1 address 10.0.0.1/24

so let's review again.
if a packet comes from LAN to INTERNET  and it has an ip inside 192.168.0.0/24
then NAT it using the pool ip_1 .


Ok.
set security policy from-zone LAN to-zone INTERNET policy allow_http

match {
      source-address any
      destination-address any
     application junos-http
then {
     permit
        firewall-authentication
              pass-through
                    client-match saar
ok, simple policy that allows http traffic to flow. The traffic flow will trigger Firewall authentication
of the type   pass-through      when you check for permissions client "saar" will be allowed out.


this is how we set up
The Firewall-Authentication part.
set access firewall-authentication

pass-through {
    default-profile Access_pass_through;
    ftp {
        banner {
            login "ftp secure access";
        }
    }
    telnet {
        banner {
            login "you are now trying to enter a secure facility";
            success "Telnet login banner";
            fail "Telnet fail login banner!!!!!";
        }
    }
    http {
        banner {
            login "HTTP login banner";
            success " HTTP success banner";
        }
    }
}


The last part is setting up ONE user for now.
set access profile Access_pass_through     client saar         firewall-user      password  #password#


Results:
Based on the above you can set up TELNET.;
The TELNET works easily and seamlessly .

HTTP. When I used a browser I got a nice user and password prompt.

FTP, I couldn't get this to work.


Wednesday, January 16, 2013

Chapter 4- Authentication

Firewall USER authentication.

You can use the Firewall to limit users permissions.
There are two methods.
Pass through   and    Web Authentication.

Pass-Through.
This only works on
1. Telnet
2. FTP
3. HTTP

[edit access]                                                     #all the Firewall stuff is under ACCESS
user@srx# show
firewall-authentication {
   pass-through {                                                     # pass-through in this case
      default-profile PROFILE   ;                               #here you tell it which profile to use to auth users
      telnet {                                                                # remember telnet,FTP, http
         banner {                                                            # banner
            success "Login successful!";                             #success, fail
         }
      }
   }
}


[edit access]
profile PROFILE {                                        #this is the profile name - we use this above
   client John_davis_the_third {                          # this is the username
      firewall-user {                                              #this is the type a firewall user
         password encrypted-password; ## SECRET-DATA                             #this is the password
      }


Now you apply this to a policy.
At the end of the policy we have the THEN.
so

then {
         permit {
            firewall-authentication {
               pass-through {
                  client-match John_davis_the_third;


So to state again.
Pass-through.
Set up the default profile and banner
Set up the profile which includes the users
Set up the Firewall-authentication at the end of the policy.


__________
OK.
Web Access.
This is a nice idea. You keep the IP of the SRX as a favorite.
You open the webpage. Login and then you can get permission to go outside.

So
1. Set up another IP address as the web-authentication address.
2. Enable HTTP on the SRX - set system services web-management http;
3. Create a user, - we will reuse John_davis_the_third.
4.  Set up a silly banner.
[edit access firewall-authentication]
web-authentication {
   default-profile profile-name;
   banner {
      success "Login successful";


5. apply it as an ACTION on a policy.
 then {
         permit {
            firewall-authentication {
               web-authentication {
                  client-match client-name;


A last side option is


then {
   permit {
      firewall-authentication {
         pass-through {
            client-match client-name;
            web-redirect;

Web-redirect basically will take an HTTP session and open a new webpage.


I got this to work in the lab if you want to try it out.


Chapter 3 - Policies

Security policies.

The first thing in policies is the context.


The Security Context.
Is basically the description of from-zone to-zone that the data is flowing.

For example.
If data goes from the internet  to the Servers.
The context is said to be.
from-zone INTERNET  to-zone SERVERS.

Now when data goes the opposite way.
The context becomes.
from-zone  SERVERS    to-zone INTERNET.

So from-zone PC to-zone SERVERS   is   another context.

Now, on a "context" you will apply policies.
Let's create a policy.

set security policies       from-zone INTERNET     to-zone SERVERS      policy   block_ping
That was easy, we define the context. from X to Y    and give it a name "block_ping".

Now inside the policy we need to put security rules.
The rules will follow a simple   IF something  THEN do
If
"webusers"    source-address
try to reach      "databaseServers"      destination-address
using protocol   "http"                     application
then
take an action    like "deny"

Let's try this.


from-zone INTERNET to-zone INTERNAL {                   #this is our context
policy deny_ping {                                                         # name of the policy

        match {                                                                  #match = IF
            source-address any;                                             #I used any
            destination-address any;
            application junos-icmp;                                        # junos has a list of ready applications
        }
        then {                                                                     # this is a programming statement IF-->THEN
            deny;                                                                # the action. In this case deny.


let's try another example.


okay,
The first context is   INTERNET to LAN.
as you can see you can create MANY policies under the context.
The SRX will go one by one and process them.
Once it hits a match to the traffic, then it will take that action.
So in this case.
policy 1 says    icmp allow
policy 2 says   telnet allow
policy 3 is the default policy at the bottom of every context which is deny all.

so if I was trying to open a web service.
policy 1 would skip me
policy 2 would skip me
policy 3 would block me and my connection would be terminated. (bye bye).

Now
let's look at the second one.
policy 1 blocks web traffic
policy 2 allows all traffic
policy 3 denies all traffic.
So in effect because the order of processing is 1 2 3 .
Policy 1 The LAN users cannot surf (deny)
Policy 2   the LAN users can get Email and do other things.
Policy 3  is the default deny.

So LAN users can do everything but surf on port 80 (http)


This is what it looks like on the SRX.

from-zone INTERNET to-zone LAN{
    policy ALLOW_HTTP_IN {
        match {
            source-address ANY_ANY;
            destination-address ANY_ANY;
            application junos-icmp;
        }
        then {
            permit ;
        }
    }
    policy ALLOW_TELNET {
        match {
            source-address ANY_ANY;
            destination-address any;
            application junos-telnet;
        }
        then {
            permit
            }
        }
    }
    policy deny_ping {
        match {
            source-address any;
            destination-address any;
            application junos-icmp;
        }
        then {
            deny;

There are MANY questions on the policies for the exam.
So I would practice reading policies.

So in this case.
Context   INTERNET to LAN
allow ICMP
allow telnet
deny ICMP
now even though there is no final any any any  deny  like I drew above.
There is an implicit deny at the end of every context. All firewalls have an implicit
deny at the end.


Some improvements.
If you notice we used a lot of   any in the above statements.
source-address any.
Now let's say I want to say,
well  if the source-address comes from199.199.199.0/24 which is our trusted Alaska office.
Then for him you can permit!!!!
We do this by creating addresses.
set security zone security-zone INTERNET address-book address Alaska_office 199.199.199.0/24

root@srx101# show security zones security-zone INTERNET
address-book {
    address Alaska_office 199.199.199.0/24;
}


This is another example.
Here I marked an address range.
root@srx101# show security zones security-zone INTERNET
address-book {
    address Europe {
        range-address 11.11.11.0 {
            to {
                16.16.16.0;

so from 11 .11.11.0  to 16.16.16.0  will be called Europe

I'll map it out.


So we have two addresses.
Alaska and Europe.
They both go in the Address book which is on the zone INTERNET

Now let's say I want to split the SERVERS zone into sub divisions.
So I can create three addresses.
WEB, DB, MAIL. These addresses will be on the address book which is on the zone SERVERS.


So now when I use the context.
set security policy from-zone INTERNET to-zone SERVERS          source-address Alaska (notice the use of address book that is on the INTERNET zone)

set security policy from-zone INTERNET to-zone SERVERS          destination-address MAIL_SRV  (notice the use of address book that is on the SERVERS zone)


set security policy from-zone INTERNET to-zone SERVERS          application junos-icmp (random application)


Now you can make a much more granular policy.
remember an address can belong only to ONE zone.


Well,
What happens if you have a custom application that runs on a custom port etc.
Junos gives you the default applications.
   junos-bootpc         [applications application <*>]
  junos-icmp         [applications application <*>]
  junos-telnet        [applications application <*>]

Well, under the [applications]
you can create a custom application.
This is an example.

root@srx101# show applications
application Saar_WEB {                              #name of application I created
    protocol tcp;                                          #protocol
    source-port 9000;                                   #port
    destination-port 99;                             #port

Now you can reference this application all over the SRX configuration.
The application is NOT tied down to a zone.
You can create it once and reference it all over.

You can also create a group of applications.
For example.
things_to_block
then include under it several applications.
this is called an application-set

application-set things_to_block {
    application junos-ping;
    application junos-telnet;
    application junos-finger;

Now instead of typing many lines, I simply reference an applications set.

I'll save you the example.
You can also do an Address-set  for the servers call it  Server_farm = DB+Mail+Web
then reference the address-set.


So Summary.
set applications       allows you to create applications.
set security zone security-zone  INTERNET address-book      allows you to create addresses on the zone


Now.
Schedulers
set scheduler    work_hours          daily  start-time 08:00:00   stop-time 17:00:00;

Ok the above is the schedule   8 to 5pm
I'll show you an example

So from 8-5 web is blocked.
If there is NO scheduler set up , then the policy is ACTIVE.


You get 4 scheduler questions or more.
So play with this.
You can re-use the Scheduler all over the SRX as it is not under another tree.

Summary.
set applications       allows you to create applications.
set security zone security-zone  INTERNET address-book      allows you to create addresses on the zone
set schedulers scheduler          will allow you to create a schedule which you can apply on the policy.


Logging.
Log from the SRX to a Syslog server.
set system syslog host 10.210.210.130    ANY   ANY

so, we set this in the system.
under [syslog]
the HOST we will be sending this to  =  syslog server     10.210.210.130

The  ANY   ANY refer to WHAT we will be sending.
the first is facilities. 


the second ANY is for the severity level.
For example I might want only the Emergency ones


This is the best I can come up with.
root@srx101# show system syslog
host 10.0.8.8 {
    any critical;
}
file traffic-log {
    any any;
    match RT_FLOW_SESSION;
}

so any critical messages will be sent to the 10.0.8.8
      any  messages that have RT_FLOW_SESSION      send them to a local file called    traffic-log

e voila.
Logging.
You can show a log
you can also clear a log.


Last thing.
If you want to work with an NSM you have to use structured-data and a specific filename.
The command is .
file default-log-messages  {
                                 any any;
                                structured-data;
              }


In order to fill in the traffic-log we created.
We can mark a policy to write to the log the
session-init   CPU intensive
session-close      not so CPU intensive.
or both.
The commands look like this.
from-zone INTERNAL to-zone INTERNET {
    policy ALLW-PING {
        match {
            source-address LAN;
            destination-address any;
            application [ junos-ping junos-telnet junos-http ];
        }
        then {
            permit;
            log {
                session-init;                                                   #log init and close. You can read the data in the traffic-log
                session-close;
            }
        }


set security policies policy-rematch enable
I found this table.
So by default this command is DISABLED.
Which mean only when you delete a policy will the session be dropped.
In all other cases the sessions keep going.

So for example.
If I go and change a policy to deny. it won't make an impact on the current flows.
I would have to reset the flows for the deny to have an impact.
Or..... I can use the policy-rematch command.


Questions.
How to reorder a policy
Use INSERT    before or after

What is the default action for every policy  
It is DENY. The last one is always DENY.

What is the purpuse of a scheduler
It is to apply a time limit on when the policy is active.

What are the Policy components.
1. Policy Context -  from-zone to-zone
2. Policy  name      -    policy block_something
3. matching conditions -     source-address, destination-address,  application
4. the action to take -    then
5. extras    -   like application-services (utm)  ,  count,   log  session-init

Tuesday, January 15, 2013

Chapter 2 - Zones


Zones

Ok ,difficult to explain.

First a Firewall can be divided into "virtual" firewalls.
When you create a NEW routing Instance.
The routing instance will have.
  • Routing tables
  • Interfaces that belong to these routing tables
  • Routing option configurations
This is an SRX.
We will divide the interfaces into two routing instances.

Now we have TWO firewalls.
To create this on the SRX we will write the following.

Set routing-instances INSTANCE1                  #this is the name of the routing instance.
set routing-instances INSTANCE1 instance-type   virtual-router            

A virtual-router has 
Routing tables
Interfaces that belong to it
Routing protocol options.

So we created a routing-instance called INSTANCE1
Now we can allocated the interfaces.

set routing-instances INSTANCE1 interface GE-0/0/0
set routing-instances INSTANCE1 interface GE-0/0/1
set routing-instances INSTANCE1 interface GE-0/0/2
etc etc
We basically gave it a name, set the type and added some interfaces.


Ok, now just to show you that this Virtual-instance can have it's own protocol settings we can set up OSPF on it.
set routing-instances INSTANCE1  protocols OSPF   area 0.0.0.0  interface GE-0/0/0

There, created an OSPF for it and added an interface.

That sums up the routing instance for now.
So .


We have TWO firewalls.
Now we can set up zones in each firewall.
(A zone can only belong in ONE routing instance).


Okay,
I made up some fake zones.
Internet GE-0/0/1
HR GE-0/0/0
Sales GE-0/0/3 
Sales GE-0/0/4

now in routing instance TWO
we have
Cloud Datacenter GE-0/0/6
Company Email GE-0/0/7

So now you can see. Some Zones are in Routing instance INSTANCE1
the other ones are   INSTANCE2.

Also you can see that Zone SALES. Has 2 interfaces.
GE-0/0/3
GE-0/0/4

OK.
So to sum this part up.
A zone can only be in ONE routing instance.
A logical interface can only be in ONE zone.


This is another way of viewing this.
This is the Juniper example from the PDF.
Remember an interface can only be in one zone
a zone can only be in one routing interface.
Each routing interface can have its own Forwarding table, routing table, routing options etc.

Okay, back to the Zones.
Let's set up our first zone.
SRX#set security zones security-zone HR interfaces ge-0/0/0             

So we set up a Zone   called it    "HR"  and added the interface ge-0/0/0

Second one.
SRX#set security zones security-zone Internet interfaces ge-0/0/1

SRX#set security zones security-zone Sales interfaces ge-0/0/3
SRX#set security zones security-zone Sales interfaces ge-0/0/4

So HR, Sales, Internet are set up.
All of the above are Security Zones. We use them for setting up security of traffic.

There are two other types of zones.
System zones-  the only zone here is the NULL. All interfaces start as NULL .
NULL will drop all traffic.
Functional-zone  - this zone is only for the management interfaces it cannot route anything. The name of it is easy it is management.
You can only add more interfaces to it.

lab@srxB-1# show security zones 
functional-zone management {
    interfaces {
        ge-0/0/2.0;                    # in this case I added ge-0/0/2

In a bigger SRX the management interface will belong to it.

so let's sum it up.
Many security zones
one functional zone  - called management
one system zone - called NULL    which is basically a black hole where all traffic gets dropped.


Ok, this is important.
Remember we have High-end SRX  and "branch" SRX.
High-End SRX have everything configured in the NULL zone. So all the interfaces are in the NULL. No traffic can pass at all as it is all in the NULL black hole. You need to explicitly allow traffic.

The Branch SRX was made for an easier deployment. So in the factory-default configuration.
You have two zones.
Trust -  Which is the LAN
Untrust -  Which will be the WAN.
in order to return a branch SRX to factory-default type
#load factory-default                                 # this sets it up as Factory default
#set system root-authentication plain-text-password               #this sets up the root password

technically, I don't like factory mode at all.
I prefer to delete all when playing with the SRX.
However the exams ask about this.


Purchasing an SRX for the labs.
Go on Ebay.
SRX100B  is the base model- It is cheap but it does not run UTM which you will need later.
SRX100H  is the "high" model - with high memory. It is more expensive and will run UTM.
Don't bother with the 200 or 550,650 etc. They all use the same JUNOS language.
You will also need some devices for the LAN and the WAN.
I suggest some cheap Cisco's. I used Cisco1841 it has an FE port and does routing.
The last thing is a Terminal server.
A terminal server allows you to console to many devices. You can get a Cisco one or a 3rd party.
I simply bought a Serial Port PCI card and stuck it in the back of an old PC.
To each connector you connect a console cable. Not pretty but "cheap".

Juniper has a lab, however it is for partners only.
https://virtuallabs.juniper.net
The labs on it are terribly scripted and I did not learn a thing on them.
However you can type the commands on them.

If you want to purchase the full thing simply contact www.myriadsupply.com
and buy yourself some Juniper SRX with proper support.
The cost can be offset by leaving your job and getting a raise.

This is the lab of Scott Morris.
I am sure he is paid a bit more than me.... :(


Alright back to zones.
Alright.
We have a Routing instance. On it we have a zone. The zone has X interfaces.

The last thing we set up on a zone is WHAT traffic can hit the SRX through the zone and the interfaces.
So logically break it up in your head.
There is traffic that flows from-zone   to-zone   this is called a Policy.
And there is traffic that flows to the zone and to the interfaces.

For example :
If I want to telnet to the SRX I will be sending traffic through the zone using an interface to the SRX.
If I want to telnet to a server on the LAN my traffic will flow through from-zone INTERNET to-zone LAN.

Ok,so anything that hits the SRX and the target of the traffic is the SRX is controlled in the zone.
The way you do this is.

SRX#set security zones security-zone Sales host-inbound-traffic
yes, it says in plain English. host bound traffic
you can set it up for the whole zone  "Sales"
or per interface. This is an example of interface.
SRX#set security zones security-zone Sales interface ge-0/0/4 host-inbound-traffic
see interface.

Now you have two options of the type of traffic you want to allow to go directly to the SRX.
system-services                        # these will be things like telnet, http, icmp
protocols                                  # these will be protocols like OSPF , BGP , RIP.

So if you want to be able to ping the device or have routing protocols reach the device.
You need to think of setting the "host-inbound-traffic".
Set it up on a zone
or an interface  (interface has priority)

alright,
How to check your zones.
First in configure mode
lab@srxB-1# show security zones 
functional-zone management {
    interfaces {
        ge-0/0/2.0;
    }
}
security-zone HR {
    interfaces {
        ge-0/0/0.0;
    }
}


almost all Juniper commands have an equivalent in the operational mode.
Operational mode is the > mode
before you type "configure" to reach the # mode.
So operational mode   >
> show security zone
Functional zone: management
  Policy configurable: No  
  Interfaces bound: 1
  Interfaces:
    ge-0/0/2.0

Security zone: HR
  Send reset for non-SYN session TCP packets: Off
  Policy configurable: Yes  
  Interfaces bound: 1
  Interfaces:
    ge-0/0/0.0

Security zone: junos-host
  Send reset for non-SYN session TCP packets: Off
  Policy configurable: Yes  
  Interfaces bound: 0
  Interfaces:

Ok,
we have some random zones.
Let's have a look.
Functional zone : management          # we already talked about this zone, it is used for the management ports
  policy configurable                           # not really, you can't really configure any policy as it does not route.
  interface bound                               # I added 1 interface ge-0/0/2 so it shows 1.
  interfaces:                                        # here it actually details the interfaces that are bound 

ok.
Second zone.
Security zone                                     # remember, many security zones .This is one example
Send reset for non-SYN session TCP packets             #Okay, first TCP packet that is NOT already in
                                                                                   session, needs to have SYN marked
                                                                                   #if it does not have SYN it resets the connection

Interface bound                # by now you got this right.


So, if we look back at the TCP packet.

We have the SYN.
The way TCP starts is.
A sends SYN                                    to B
B sends  SYN, ACK                         to A
A sends ACK                                    to B
and then the data will flow.

The Juniper Zones can protect themselves against DDoS attacks by doing the following.
A. Check if I have a session. Remember the Flow session ?? if I have a sessions then use the session.
B. If I do not have a session. I need to create a new one. So if I have the SYN marked. I will create
a new one. If the SYN is unmarked. That is fishy. So DROP it.
The way Juniper writes this is.
"" receives a non-SYN TCP segment that does not belong to an existing session, it drops the packet and sends the source host to a TCP RST""
So basically the Juniper SRX assumes there is something bad and says. HOLD ON , start again from the beginning.

Normally this is disabled. If you use HA it is good it is disabled.
Juniper recommends enabling it.
To enable it run.
lab@srxB-1# set security zones security-zone HR tcp-rst    


Ok.
what else is on show.
lab@srxB-1> show interfaces ge-0/0/2 extensive
Security: Zone: HR
    Allowed host-inbound traffic : bfd bgp dvmrp igmp ldp msdp nhrp ospf ospf3
    pgm pim rip ripng router-discovery rsvp sap vrrp

I guess with extensive you can check what is allowed directly.

You can also look at FLOW statistics.
Flow Statistics :  
    Flow Input statistics :
      Self packets :                     0
      ICMP packets :                     0
      VPN packets :                      0
      Multicast packets :                0


Fun fun.

So let's re-coop.
set security zones security-zone    NAME   interface xx-0/0/x    HOST-INBOUND-TRAFFIC
              with the protocols/system-services.

Then to see the results.
show security zone NAME
and show interface xx-0/0/x   extensive.

Voila.
Those are ZONES.


Some questions.
What is the purpose of a zone.
A zone is a collection of logical interfaces sharing   the same security requirements.
So if I want the same security rules on ge-0/0/3-4 then I will use a zone.

What zone types do you have.
User defined -   Security or functional (management)
system defined-  NULL, the blackhole of firewalls.

What are the steps for configuring a zone.
Pick  a name.  Then just go  set security zones security-zone NAME
then add interfaces and set up SRX bound traffic .

How do you specify the traffic allowed to the device.
set security zones security-zone host-inbound-traffic
set up the host inbound traffic with  protocols or system-services.

C U.

Chapter 1 - Intro

These are my notes for the JNCIS-SEC exam.

The only material available is two PDFs
JNCIS-SEC study guide part 1 and part 2.
This is a companion guide, read it as you go through the PDFs.


A router vs Firewall
A router makes a decision in a state less fashion.
The decision is basically a one liner.
Saying if something comes from here to there then allow it.


A Firewall is more intelligent
it allows you to run Stateful rules. They also call this Stateful packet processing.


In this example.
PC1 asked the Server(SRV007)   for a Web page  using port 80.
The Firewall therefore expects the web server to respond with the Web page.
So it leaves a reverse route open for the web server.

This route will remain open for the default session timers.
The default timers are 30 minutes for TCP.
The default timers are 1 minute for UDP.


Let's practice seeing this.
This is an example of what it will look like.
You cannot currently see this till you set up your own SRX.
This is the layout of this Lab.

The command is either
> show security flow session
or
If you are in Cofigure mode   # run show security flow session.


root@srx101# run show security flow session
Session ID: 7085, Policy name: ALLW-PING/4, Timeout: 2, Valid
  In: 192.168.0.2/84 --> 10.0.0.1/32;icmp, If: fe-0/0/6.0, Pkts: 1, Bytes: 100
  Out: 10.0.0.1/32 --> 10.0.0.50/25316;icmp, If: fe-0/0/7.0, Pkts: 1, Bytes: 100

This is important and on the tests.
The first thing you will see is WHICH policy is handling this flow.
In this case my policy is   ALLW-PING
The second thing to look at is who is sending it.
In this case the LAN IP of 192.168.0.2  will go out to   10.0.0.1 (Server)
When it comes back  there is already a reservation called OUT  which will send the
PING response back to the LAN PC.  {{In the above Example there is a SourceNAT }}


Juniper SRX information
High End Juniper


I made the above slide to try to explain them in one slide.
It won't be easy.
Now.
First and foremost. Juniper has.
RE  Routing Engine
Forwarding Engine.
This is the pride and joy of Juniper. The RE runs separately from the Forwarding.
So if you update the device. The Forwarding keeps running. If you update the RE the forwarding keeps running. etc.
So remember the Routing Plane   runs    separately from the Forwarding plane.

Second, Juniper has 3 device families in the high end SRX.
1400
3xxx
5xxx
the xxx marks the number of slots.

So - Routing engines.
In the SRX 1400 it will be in the front.
In the SRX 3xxx it will be in the back
on the SRX 5xxx  it will be mounted on the SCB Switch control board


I/O cards
Yes, very simple. Each I/O allows you to connect devices to the Firewall.


In the case of the SRX1400 you get a GigE or 10 GigE I/O card and you can add another.
In the case of the SRX 3xxx You can add  them
In the case of the SRX 5xxx you can add them as line cards


SPC - Service Processing Card.
A Service processing card handles the Services. It basically is a CPU and will run the Services
like IDP, IPS, VPN, NAT anything you want. The more SPCs in the device the faster the SERVICES
will run on it.

In the case of the SRX 1400 , the SPC is bolted on the same card as the NPC.
In the case of the SRX 3xxx , you need to add them to a slot. So they take room.
In the case of the SRX 5xxx, they take up a WHOLE line card slot.


NPC- Network Processing Card.
A Network Processing card handles the data from the I/O cards and distributes it to the right SPC or out the right I/O card.  It can be used for the DDoS and the QoS.
So
This is an example.
The PC talks to a switch that goes into the I/O module. Remember the I/o has ports.
The I/O module asks the NPC where to FLOW. Either to an existing flow or a new one.
The NPC, then tasks the SPC to do a SERVICE for example NAT.
The SPC will return a response .
The NPC now will send the FLOW to the Egress I/O and from there to the WEB.

Remember the Security flow sessions we talked about earlier.
So the Firewall will add a session for the return of the packet back.

So the NPC does networking, like forwarding for example.


On the SRX 1400   the NPC is bolted on with the SPC
On the SRX3xxx it takes a slot in the chassis.
On the SRX 5xxx the NPC are BUILT inside the I/O modules.

So to sum it up, the I/O modules on the SRX 5xxx are very smart as they have the NPC bolted on.


The above are the HIGH RANGE SRX. There are more options but they will confuse you.
For now.
RE routing engine,    SPC  does services,   NPC  runs the network  and   I/O are input output ports.


SRX Midrange or low End.


Ok, Low range.
Keys to remember.
The SRX100 do not have a Anti-Virus Express accelerator or a CSA. They also do not have PIM.
The SRX 200 only differ on the number of PIM slots.
The SRX 650 has a Routing Engine. SRE it is replaceable.
All of the above can run the UTM Unified threat management, like the AV,Anti-Spam,WebFiltering etc.

All of the above have ONE CPU with many cores.
Routing Engine will run on ONE core. The data plane will run on the rest of the cores.
Some have PoE and some have 3G slots but don't try memorizing.

This is the flow.
Port then switch then CPU. The goal here is to save the CPU from wasting cycles on easy switching.


Okay,
How does the Juniper Firewall work.
Let's have a look at the FLOW.
How things FLOW around the Firewall.


So a packet comes.
The first thing is on the INTERFACE. You can limit how many packets come in (Policing)
Then on the INTERFACE you can set up static firewall rules, like drop all port 23 (Per Packet Filter)
This is similar to how you run IOS rules on a router.

This is an example of a Filter on an interface.

ge-0/0/0 {                               # interface GigE 0/0/0
   unit 0 {                                  #Unit 0
      family inet {                       # family IPv4
         filter {                                 #  apply a Filter
            input icmp-filter;                  # input means incoming and the name of the filter icmp-filter.
         }
         address 1.1.1.1/30;                 #random IP address on the interface.

#show firewall family inet filter icmp-filter
icmp-filter {
   term 1 {                                  # Every part of a Filter is a TERM.
      from {                                           # from
         source-address any ;                     #any IP
         destination-address 1.1.1.1;            # to the IP of the interface
         protocol icmp;                                  #  protocol  ICMP(ping)
      }
      then {                                                  # then says take this action.  From -> Then
         count icmp-counter;                        # count , So this will count how many ICMP I am getting
         accept;                                             # after you finish counting, just accept it.


Ok, so packet made it across the interface.
Now if there was already a FLOW, the packet gets a shortcut  called Fast path.
IF there was no existing FLOW, then it has to go all the way again.
The way is.

Screen option - DDoS protection. So it will be dropped if it is DDoS.
Destination NAT -  The SRX will convert the IP to the proper destination .
Route-   the SRX will then ROUTE the packet   using the (forwarding table).
Zones-   based on the route, it can figure out which zones does it need to go throught.
Policy -  when traffic passes between zones a policy will be applied.
SourceNAT  -   If all goes well then if there is a source NAT it will change the IP before leaving.
Services ALG-   is the final step where the device will run the UTM features. Like AV/AS/Web flitering.
After the above are done a session is created
and a Flow is added in the session table for the return packets.
Then it simply leaves out the Egress interface.
Where it might get "shaped".


Run-Time Changes.
Yes, I think there is a question on this.
Routing run-time changes will change the session. ALWAYS.
Now if you change the Security Policy it will not affect the current sessions.
That is unless you run
#set security policies policy-rematch                  
this command causes the change in policy to drop current sessions

So to sum up run-time changes.
Routing Always - you want the packet to be able to reach the destination even if a line dropped.
Security policy - sometimes. If you want to force it, run the command policy-rematch.

Alright.
Last example of this chapter.
A Packet flow


Ok,
new packet.
10.1.20.5
Does it have a session   (let's say no)
Screen    (not a DDoS)
Destination NAT  (no)
Route -  (OK look at the routing table to see where it goes to)
Zone   - map out the relevant interfaces it will go to using the ZONES.
Policy -  once you know the zones it goes from . You look if the policy of the zone to zone allows it. (ok)
E Voila.
Add it to the sessions table with the   FLOW session ready to receive the returning packet.

Then simply send it to the WEB

Ok.
Some easy questions.
Routers use _____ processing
Firewalls use     ______ processing
What is the difference between Security platforms and routers
What is the shortcut route in Junos Flow called.


Answers are.
A. Per Packet
B. Per Flow
C. Security platforms start off with a DENY , routers start with allow everything.
D.  the Shortcut route is called    "fast path".